3D Printer Build Post 1 (RepRap Prusa Mendel)
The long journey to building a 3D printer has been underway for quite a while now. With the complete set of parts ordered and much of the construction finished I decided to share the progress; outline my frustrations, and post about how you can benefit from my mistakes.
I have been building the printer for over a month; and the last batch of parts arrived early this week. What can clearly be said about this project is that you will underestimate it. The original plan was to get this working in six months. Once construction was underway; it seemed more like a month. It now looks like this could really take up to six months (to produce a quality 3D printed part). In this part of the coverage; I hope to outline the budget and basic build so far; finally going over some problems and warning points.
The budget for this printer is quite high. It is a mid-range open source 3D printer known as a Prusa Mendel. You can find the wiki for it here. I chose to start with the basics (more on this later). So here is the budget:
Here are the basic pictures; showing various steps of the frame building process. I cut the rods myself; making a jig according to this page. I then used the electric saw to get through them quickly.


At this point I lost my memory card; so there is a gap of missing pictures. They weren't very interesting anyways. The pictures resume with motors in place and the y-axis completed.


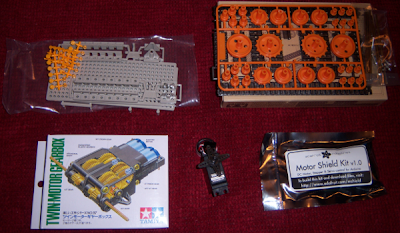
The extruder which feeds plastic into the hot end has to be 'hobbed'; basically you give it teeth so that it grips the plastic. The extruder can then force plastic into the hot end which acts as a glue gun (but for plastic). I hobbed by hand. Following that sparks are some pictures of the extruder; which came together easily.


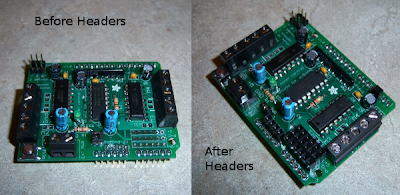
With the extruder completed, tested, and mounted - the basic build was complete. I didn't want to start wiring things up until I got some chores out of the way. So the second picture below is my converted ATX power supply. I may do a complete post on this; as it is very useful for anyone doing robotics/arduino. The short and sweet? Connect the green to ground; then all of the orange (3.3v), red (5v), and yellow (12v) become easy power. The other wires can be removed.

At this point I have begun working on the wiring and getting everything to the final setup. There is still a ton of work to do however and I do not think that my carriages move as freely as they should. That said; I did want to share some of my sticking points in case you are considering this venture for yourself. So; consider these points before you start and you can benefit from my troubles.
I have been building the printer for over a month; and the last batch of parts arrived early this week. What can clearly be said about this project is that you will underestimate it. The original plan was to get this working in six months. Once construction was underway; it seemed more like a month. It now looks like this could really take up to six months (to produce a quality 3D printed part). In this part of the coverage; I hope to outline the budget and basic build so far; finally going over some problems and warning points.
The budget for this printer is quite high. It is a mid-range open source 3D printer known as a Prusa Mendel. You can find the wiki for it here. I chose to start with the basics (more on this later). So here is the budget:
- The starter kit $195.00 (from this ebay auction)
- Rods - Threaded and Smooth, $68.17 (McMaster.com)
- Motors - Pololu Nema 17 x 5 $104.70 (Pololu.com, item link)
- Hot End and Ramps 1.4 $364.00 (Ultimachine.com)
- Wire, digital caliper, etc. ~50.00
Here are the basic pictures; showing various steps of the frame building process. I cut the rods myself; making a jig according to this page. I then used the electric saw to get through them quickly.
 |
| Preview... |


At this point I lost my memory card; so there is a gap of missing pictures. They weren't very interesting anyways. The pictures resume with motors in place and the y-axis completed.


The extruder which feeds plastic into the hot end has to be 'hobbed'; basically you give it teeth so that it grips the plastic. The extruder can then force plastic into the hot end which acts as a glue gun (but for plastic). I hobbed by hand. Following that sparks are some pictures of the extruder; which came together easily.


With the extruder completed, tested, and mounted - the basic build was complete. I didn't want to start wiring things up until I got some chores out of the way. So the second picture below is my converted ATX power supply. I may do a complete post on this; as it is very useful for anyone doing robotics/arduino. The short and sweet? Connect the green to ground; then all of the orange (3.3v), red (5v), and yellow (12v) become easy power. The other wires can be removed.
 |
| Before putting the top back on. |
- A dremel is NOT an optional tool. You will need to correct parts, cut parts; etc.
- Have a large work area available; I am using both my full desk; a table I purchased and a couple shelves.
- Have something to organize parts; similar to component bins. There are a LOT of nuts, bolts and washers.
- Have a small enough level; if your level is too big; it doesn't fit against the rods and you will have trouble leveling. You could also have a spacer ready; but remember you need to level various parts.
- A digital caliper is highly recommended for accuracy.
- Plan for the 'breaks'; you will have two glue steps where you glue and walk away. You will also apply ceramic to the hot-end and it should sit overnight.
- Have your PSU ready before you attempt to build your hot-end; you will need the +12v for curing.
- How does the hot end attach to the extruder? I really cannot find this!
- Preparing the default bed; do I just put aluminum foil on it? All documentation seems to simply skip this and references the 'prepared print bed'.
- I will know more tonight; but you apparently need a linux box to build and upgrade the firmware. I will update this entry based on my findings.
- How should the Arduino Mega be powered; usb?

Comments