Arduino Robot 1 - The Basic Tank
What you see below is the result of my first attempt at building a robot. The goal was to build something Arduino based. It would move forward, turn around, come back; and then turn around again to be in its original position. Finally, I wanted to try multiple part selling web sites, to get experience with who to buy from. Fortunately; they were all better than expected experiences. My Arduino was a Christmas present; but I will be factoring 32.00 into the cost of the project to account for it.
The first phase was an order from SuperDroidRobots.com. Tank treads, a double motored gear box, and some plastic to build a chassis came in at $40.00. The second order was from Adafruit.com, for a continuous rotation servo and an Arduino Motor Shield. The Adafruit order also came in at $40.00. Subtracting the cost of the unused Servo, this robot is built for just under $100.00. You can see the initial parts order below.
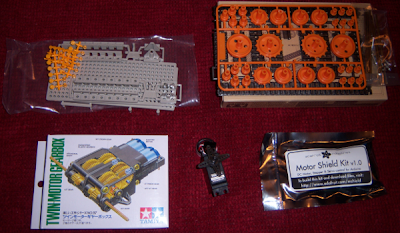
I started by building the motor shield, this is the motor shield kit when taken out of the anti-static bag.

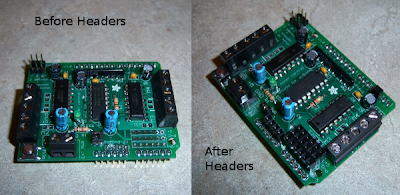
This is the completed Arduino Motor Shield after soldering everything into the board. The pins coming out of the bottom are the interface to the Arduino. You will notice two jumpers near the bottom middle of the picture. This is the motor power jumper, and is used in conjunction with the external power supply input; which is the block of two screw terminals just to the left of the jumper. You can see it says "EXT_PWR".

I moved on to building the "tank", this would be the chassis to hold the gearbox and Arduino + Motor Shield. I would later realize it had to hold two battery packs; one for the Arduino and one to power the motors via EXT_PWR. Getting the little plastic treads together wasn't fun, but everything came together.

I had to solder two lines to the motors for them to work, then wire everything up. The wiring is supplying 6V from a battery pack to the motors, and there is the standard Arduino 9V battery pack powering it. Both packs are held to the chassis by velcro. You can see the Motor Shield stacked on the Arduino. Here is the final bot with source.

Finally, it all gets put into motion. I made some mistakes that others should watch out for. The motors that come with the Tamiya gearbox don't work well with the Motor Shield. Their stall rating is too high. If not for this, the code above would simply use a 'delay'; but with the Tamiya motors; the delay keeps the motors from ever getting past stall. Also, the battery pack isn't needed. In this simple case the 9V + setting the jumper would power the two motors just fine. It was fun! I have ordered my first sensor; so I'll be starting Robot 2 - Wandering Tank. Here is Robot 1 in action:
The first phase was an order from SuperDroidRobots.com. Tank treads, a double motored gear box, and some plastic to build a chassis came in at $40.00. The second order was from Adafruit.com, for a continuous rotation servo and an Arduino Motor Shield. The Adafruit order also came in at $40.00. Subtracting the cost of the unused Servo, this robot is built for just under $100.00. You can see the initial parts order below.

I started by building the motor shield, this is the motor shield kit when taken out of the anti-static bag.

This is the completed Arduino Motor Shield after soldering everything into the board. The pins coming out of the bottom are the interface to the Arduino. You will notice two jumpers near the bottom middle of the picture. This is the motor power jumper, and is used in conjunction with the external power supply input; which is the block of two screw terminals just to the left of the jumper. You can see it says "EXT_PWR".

I moved on to building the "tank", this would be the chassis to hold the gearbox and Arduino + Motor Shield. I would later realize it had to hold two battery packs; one for the Arduino and one to power the motors via EXT_PWR. Getting the little plastic treads together wasn't fun, but everything came together.

I had to solder two lines to the motors for them to work, then wire everything up. The wiring is supplying 6V from a battery pack to the motors, and there is the standard Arduino 9V battery pack powering it. Both packs are held to the chassis by velcro. You can see the Motor Shield stacked on the Arduino. Here is the final bot with source.

#include <AFMotor.h>

AF_DCMotor motor1(1, MOTOR12_64KHZ); // create motor #2, 64KHz pwm
AF_DCMotor motor2(2, MOTOR12_64KHZ); // create motor #2, 64KHz pwm

unsigned long tCnt = 0;
unsigned long tStart = 0;
unsigned long tDelta = 0;

void setup() {
  Serial.begin(9600);           // set up Serial library at 9600 bps
  motor1.setSpeed(255);     // set the speed to 200/255
  motor2.setSpeed(255);     // set the speed to 200/255
  tStart = millis();
}

void loop() {
   tDelta = millis() - tStart;
   tCnt += tDelta;
   tStart += tDelta;
   // run motors for 5 seconds.
   if( tCnt <= 5000) {
   motor1.run(FORWARD);      // turn it on going forward
   motor2.run(BACKWARD);      // turn it on going forward
      return;
   } else if ( tCnt <= 6300 ) {
   motor1.run(BACKWARD);      // turn it on going forward
   motor2.run(BACKWARD);      // turn it on going forward
      return;
   } else if ( tCnt <= 11300 ) {
   motor1.run(FORWARD);      // turn it on going forward
   motor2.run(BACKWARD);      // turn it on going forward
      return;
   } else if ( tCnt <= 12600 ) {
   motor1.run(FORWARD);      // turn it on going forward
   motor2.run(FORWARD);      // turn it on going forward
      return;
   }
      motor1.run(RELEASE);      // stopped
      motor2.run(RELEASE);      // stopped
}
Finally, it all gets put into motion. I made some mistakes that others should watch out for. The motors that come with the Tamiya gearbox don't work well with the Motor Shield. Their stall rating is too high. If not for this, the code above would simply use a 'delay'; but with the Tamiya motors; the delay keeps the motors from ever getting past stall. Also, the battery pack isn't needed. In this simple case the 9V + setting the jumper would power the two motors just fine. It was fun! I have ordered my first sensor; so I'll be starting Robot 2 - Wandering Tank. Here is Robot 1 in action:

Comments