3D Printer Build Post 2 (RepRap Prusa Mendel)
My long journey concerning this printer has turned out to be a glorious one. With objects coming off the printer with a pretty high quality; and my ability to design objects starting to form, it became time to share the progress and information. I will answer my own questions from the end of the previous post; outline more of the printer build, and share the general experience. Also, I will address the budget with an update.
Alright, so let's see it!
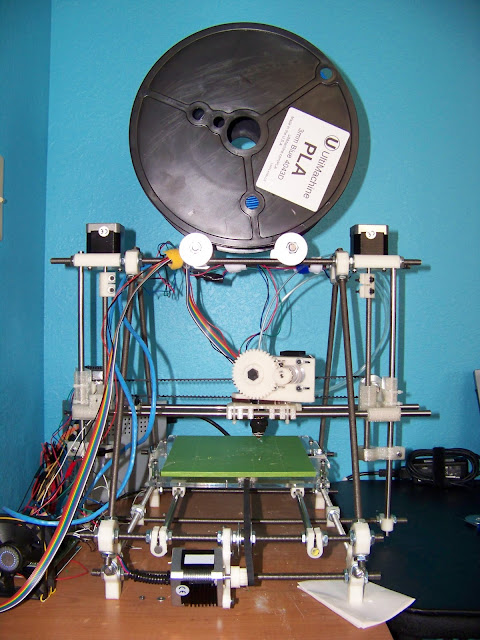
Above is my RepRap (Prusa) as it sits today. It is half converted over to version 2. I chose to do this conversion to understand the printer better, and more importantly to improve the prints. The original build calls for using printed clamps on the axis; and the plastic simply slides. This is fine; but the clamps have to be replaced periodically and you just don't get accurate movement. So I printed a new X-axis, new Z-axis, some stabilizers and purchased a set of LM8UU shaft bearings to mount the new parts. Here are closeups of the new X-axis and Z-axis.


You can see the role of the LM8UU bearing. The Y-axis still uses the old printed clips. You can see them in this picture for comparison.

Obviously the shaft bearing works way better. although the clip design is really good and it works surprisingly well as a printable solution. To complete this tour of the upgrades, we can compare the old Z-axis to the new one, and show the Dremel work I did on the z-axis coupler at the top. I cut out the center so I could separately tighten the two ends. Here are the pictures.


The last upgrade to talk about is visible at the top of the first picture. I printed a mount for a large Ultimachine spool of PLA. I haven't gotten to the spool yet (finishing up the clear PLA), but it's ready to 'spin' now.
With all of that said, it would be wise to update the budget. The budget previously stood at $782.00, and I did some upgrades and had to purchase the LM8UU bearings.
The next topic to cover are notes from my build. A LOT of work goes into getting the printer 'correct'; once it is built there are a whole new set of challenges ahead.
The best place to find things to print is Thingiverse. The software uses STL files that are representations of 3d models. The software then cuts the model into layers and modifies as needed in order to print. Frequently you will have to add supports that you cut away/etc; in order to make a print work. Here are some objects on Thingiverse that I really like:
If you follow it; you can see what I've printed (some) and what I like. I haven't uploaded anything(yet).
To take it further, you will want to design your own objects. I have been using OpenSCAD to design things. Although I use the term 'use' lightly, I'm still learning. OpenSCAD is a programmer's design tool; you write scripts that generate objects. Once done, you can export them to STL, have them sliced and run them off the printer.
To wrap this up; here is an object I designed in OpenSCAD and printed. Just a small business card holder. I hope to parametrize it and print a larger one as a stand from my Kindle DX.


If you are looking for some good videos of the reprap in action, checkout this guys channel on Youtube. He has filming setup, where as I don't.
A great video of his:
That wraps up this post; and hopefully opens the door for many more. Feel free to send me questions or feedback. I hope everyone had a great holiday and came into the new year with a sense of renewal and determination!
Alright, so let's see it!

Above is my RepRap (Prusa) as it sits today. It is half converted over to version 2. I chose to do this conversion to understand the printer better, and more importantly to improve the prints. The original build calls for using printed clamps on the axis; and the plastic simply slides. This is fine; but the clamps have to be replaced periodically and you just don't get accurate movement. So I printed a new X-axis, new Z-axis, some stabilizers and purchased a set of LM8UU shaft bearings to mount the new parts. Here are closeups of the new X-axis and Z-axis.


You can see the role of the LM8UU bearing. The Y-axis still uses the old printed clips. You can see them in this picture for comparison.

Obviously the shaft bearing works way better. although the clip design is really good and it works surprisingly well as a printable solution. To complete this tour of the upgrades, we can compare the old Z-axis to the new one, and show the Dremel work I did on the z-axis coupler at the top. I cut out the center so I could separately tighten the two ends. Here are the pictures.


The last upgrade to talk about is visible at the top of the first picture. I printed a mount for a large Ultimachine spool of PLA. I haven't gotten to the spool yet (finishing up the clear PLA), but it's ready to 'spin' now.
With all of that said, it would be wise to update the budget. The budget previously stood at $782.00, and I did some upgrades and had to purchase the LM8UU bearings.
- Upgrades - Free. Printed on my printer.
- LM8UU bearings - $15.00 w/shipping (Ebay)
- Additional PLA - $76.95 w/shipping (Ultimachine Blue PLA Spool)
- Razor blades and Miscellaneous like zip ties.
The next topic to cover are notes from my build. A LOT of work goes into getting the printer 'correct'; once it is built there are a whole new set of challenges ahead.
- Do the axis move correctly? Does telling each of them to move 10cm move them exactly 10cm? This will be adjusted in firmware until it is as correct as you have patience for.
- Do the axis move smoothly, or do they jerk? You'll end up printing tension mounts for your belts and converting over to LM8UU so that your prints don't start 'shifting' mid print when something skips.
- Is the whole thing rigid enough and on a rigid base? Get a good print going and a bad table or weak frame tightening will cause the frame, the table or both to shake.
- Is the bed level and is the print head setup to be the correct distance from the print bed when home? Instructions say 1 or 2 sheets of paper; yep. Easy :-(
- Does the Z-axis wobble? This is why I did the work on the z-axis couplers and added the stabilizers at the bottom. Without that work the rods wobble and the print wobbles as it goes up.
- Does the extruder push through 10cm of plastic when told to? This has to be adjusted physically (is your hobbed bolt working properly?) and in firmware.
- Are the motor steppers AC adjusted correctly? Too high; they'll overheat (and burn you!), too low and they'll miss steps. I added heat sinks; but ended up not needing them.
- Is your software configured correctly? Correct filament width; correct temperature settings for your filament? Correct fill settings? Correct layer height/width? I spent weeks on this.
The best place to find things to print is Thingiverse. The software uses STL files that are representations of 3d models. The software then cuts the model into layers and modifies as needed in order to print. Frequently you will have to add supports that you cut away/etc; in order to make a print work. Here are some objects on Thingiverse that I really like:
- http://www.thingiverse.com/thing:12351
- http://www.thingiverse.com/thing:12097
- http://www.thingiverse.com/thing:12633
If you follow it; you can see what I've printed (some) and what I like. I haven't uploaded anything(yet).
To take it further, you will want to design your own objects. I have been using OpenSCAD to design things. Although I use the term 'use' lightly, I'm still learning. OpenSCAD is a programmer's design tool; you write scripts that generate objects. Once done, you can export them to STL, have them sliced and run them off the printer.
To wrap this up; here is an object I designed in OpenSCAD and printed. Just a small business card holder. I hope to parametrize it and print a larger one as a stand from my Kindle DX.


If you are looking for some good videos of the reprap in action, checkout this guys channel on Youtube. He has filming setup, where as I don't.
A great video of his:
That wraps up this post; and hopefully opens the door for many more. Feel free to send me questions or feedback. I hope everyone had a great holiday and came into the new year with a sense of renewal and determination!

Comments