Arduino Robot 2 - Wandering Tank
My second robot was a bit more complex and ended up taking twice as long to build as originally intended. The budget changed, the designed changed, and my understanding of Robotics in general changed. The second robot is an attempt to make an obstacle avoidance robot that isn't overly simple. I will be outlining the goals, budget, build and code for Wandering Tank.
The goals for Wandering Tank were simple:
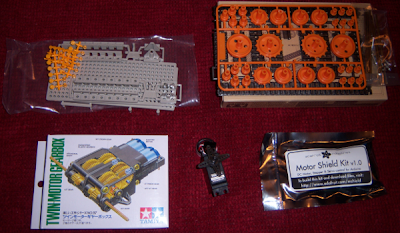
The budget for Wandering Tank was quite cheap. Since I started with Robot 1, the only additional cost for Wandering was the sensor and the servo.
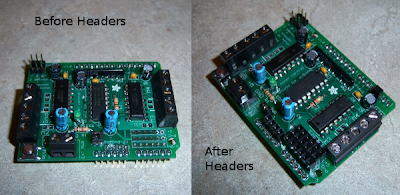
Building Wandering Tank was pretty quick. The chassis was modified to hold a servo and the wiring for the motors was improved. Originally the original continuous servo was used, which you will see in the previous post about scanning. Eventually a real servo was purchased and replaced the scanning mechanism. The first thing I did, was improve the motor shield by adding headers for the Arduino ports that it wasn't using. You can see here on the lower right and upper right the additional headers:
The next step was to modify the chassis to hold a standard size servo. The servo was lined up and used as a tracing template, I then cut out the area to make room. You will also notice in the first picture the improved running of the motor wires, and that the gear box is moved out slightly. This made the treads tighter and the robot moved better! Finally, the battery for the Arduino (9V DC) now fit underneath with room for the servo. In the middle on top is the velcro for the motor battery pack.

Next the servo was mounted with the Velcro piece in place to hold the sensor. In the picture, the motor shield battery is in place as a test fitting.

Finally, everything is assembled and you have Wandering Tank (that does nothing):

With the bot built, it was time to write code to do the actual logic. The code for the scanner from the previous post couldn't be used and I ended up starting over. The code would work life this:
And finally, here is Wandering Tank in action:
The goals for Wandering Tank were simple:
- Should be able to scan an area in front of itself.
- Should be able to avoid not only walls, but obstacles.
- Avoid random decision making; the robot should use information when avoiding.
The budget for Wandering Tank was quite cheap. Since I started with Robot 1, the only additional cost for Wandering was the sensor and the servo.
- Robot 1 ($98.00)
- Sensor - Digital Distance Sensor 10cm $6.95 + $2.00 S&H (est)
- Servo - HiTec HS-311 Standard Servo (Greenfield News & Hobby) $10.99
Building Wandering Tank was pretty quick. The chassis was modified to hold a servo and the wiring for the motors was improved. Originally the original continuous servo was used, which you will see in the previous post about scanning. Eventually a real servo was purchased and replaced the scanning mechanism. The first thing I did, was improve the motor shield by adding headers for the Arduino ports that it wasn't using. You can see here on the lower right and upper right the additional headers:

The next step was to modify the chassis to hold a standard size servo. The servo was lined up and used as a tracing template, I then cut out the area to make room. You will also notice in the first picture the improved running of the motor wires, and that the gear box is moved out slightly. This made the treads tighter and the robot moved better! Finally, the battery for the Arduino (9V DC) now fit underneath with room for the servo. In the middle on top is the velcro for the motor battery pack.

Next the servo was mounted with the Velcro piece in place to hold the sensor. In the picture, the motor shield battery is in place as a test fitting.

Finally, everything is assembled and you have Wandering Tank (that does nothing):

With the bot built, it was time to write code to do the actual logic. The code for the scanner from the previous post couldn't be used and I ended up starting over. The code would work life this:
- Update Sensor Angle
- Scan with Sensor
- Move
/*
 * George Frick (george.frick@gmail.com)
 * Jan/Feb 2010.
 * Arduino Robot 2 - Wandering Tank
 * This robot will wander around, scanning with a very short range forward IR.
 * When an object is detected, the robot will turn based on the position of the IR sensor
 * during the detection. The robot will move backwards, then turn away from the detected object
 * and continue. The robot runs continuously.
 */
#include <AFMotor.h>
#include <Servo.h>

// Two motors, a servo, and an IR sensor.
AF_DCMotor motor1(1, MOTOR12_64KHZ); // create motor #1, 64KHz pwm
AF_DCMotor motor2(2, MOTOR12_64KHZ); // create motor #2, 64KHz pwm
Servo sensorServo;
const int irPin = 19; // pin 5 as digital is pin 19

// Timing. I don't like using delay.
unsigned long tCnt = 0;
unsigned long tStart = 0;
unsigned long tDelta = 0;
unsigned long tTurn = 0;

int state;               // Current Robot State
int lastState;           // Previous Robot State
int servoPos;            // Position to send servo
int servoDirection;      // Direction servo is turning
int lastDetectionAngle;  // Position of servo at last IR detect.

// Constants for state of tank tracks.
const int STATE_FORWARD = 1;
const int STATE_TURN_RIGHT = 2;
const int STATE_BACKWARD = 3;
const int STATE_TURN_LEFT = 4;

// Constants for Servo.
const int DIR_LEFT = 0;
const int DIR_RIGHT = 1;
const int MIN_DEGREE = 40;
const int MAX_DEGREE = 140;

/*
 * Initializes everything. Is run once.
 */
void setup() {
  Serial.begin(9600);           // set up Serial library at 9600 bps
  sensorServo.attach(10);  // attaches the servo on pin 10
  pinMode(irPin, INPUT);
  motor1.setSpeed(255);     // set the speed to 200/255
  motor2.setSpeed(255);     // set the speed to 200/255
  tStart = millis();
  lastState = state = STATE_FORWARD;
  servoPos = 90;
  servoDirection = DIR_RIGHT;
  sensorServo.write(servoPos);
  //state = 0; // Uncomment to have robot not move tank tracks.
}

/*
 * Runs continuously.
 * 1. Update Servo.
 * 2. Check IR sensor.
 * 3. Move Robot
 */
void loop() {
  tDelta = millis() - tStart;
  tCnt += tDelta;
  tStart += tDelta;

  // Tell the servo to move 2 degrees every 25 ticks.
  if( tCnt > 25 ) {
    tCnt = 0;
    if( servoDirection == DIR_LEFT ) {
      servoPos -= 2;
    } else if( servoDirection == DIR_RIGHT) {
      servoPos += 2;
    }

    // Servo position will be beyond desired angles, turn around.
    if( servoPos >= MAX_DEGREE ) {
      servoDirection = DIR_LEFT;
    } else if( servoPos <= MIN_DEGREE ) {
      servoDirection = DIR_RIGHT;
    }
    sensorServo.write(servoPos);
  }

  // Allows disabling of tracks by setting state to 0.
  if(state == 0) {
    moveRobot();
    return;
  }

  // Double read the pin, @see forums.adafruit.com
  digitalRead(irPin);
  delay(5);
  if( digitalRead(irPin) == 0 ) {
    lastDetectionAngle = servoPos;
    state = STATE_BACKWARD;
  } else {
    if( state == STATE_BACKWARD ) {
      if( lastDetectionAngle > 105 ) { // right
        state = STATE_TURN_LEFT;
        tTurn = 1000; // turn for ~1 seconds
      } else if( lastDetectionAngle < 75 ) { // left
        state = STATE_TURN_RIGHT;
        tTurn = 1000; // turn for ~1 seconds
      } else { // center
        state = STATE_TURN_RIGHT; // for now, turn right by default.
        tTurn = 1500; // turn for ~1 seconds
      }
    } else if ( state == STATE_TURN_RIGHT || state == STATE_TURN_LEFT ) {
      tTurn -= tDelta;
      if( tTurn <= 10 ) {
        state = STATE_FORWARD;
      }
    } else {
      state = STATE_FORWARD;
    }
  }

  moveRobot();
}

/*
 * Uses the state of the robot to move tank treads accordingly
 */
void moveRobot() {

  // The motors seemed to respond better if they receive a stop before a switch in direction.
  if( state != lastState ) {
    motor1.run(RELEASE);      // stopped
    motor2.run(RELEASE);      // stopped
  }

  switch( state ) {
    default:
      return; // helps test, state 0 = dont move.
    case STATE_FORWARD: {
      motor1.run(FORWARD);      // turn it on going forward
      motor2.run(FORWARD);      // turn it on going forward
      break;
    }
    case STATE_BACKWARD: {
      motor1.run(BACKWARD);      // turn it on going forward
      motor2.run(BACKWARD);      // turn it on going forward
      break;
    }
    case STATE_TURN_RIGHT: {
      motor1.run(FORWARD);      // turn it on going forward
      motor2.run(BACKWARD);      // turn it on going forward
      break;
    }
    case STATE_TURN_LEFT: {
      motor1.run(BACKWARD);      // turn it on going forward
      motor2.run(FORWARD);      // turn it on going forward
      break;
    }
  }

  lastState = state;
}

/* EOF */
And finally, here is Wandering Tank in action:

Comments