Upgrading The 3D Printer And Hexy Build Notes (Prusa RepRap)
What a busy couple of weeks I have had. Many upgrades for the printer have arrived, and work continues on understanding and possibly building Hexy before my Kickstarter version arrives from Arcbotics. In this post I will cover the upgrades I have made to the printer; why I made the upgrades, their cost; and finally show some updated Hexy prints to show off the new accuracy.
First; I was printing the Seej Starter Set, in preparation for taking my printer to work on my last day. While doing so, the printer gave up the ghost. Badly. First, the z-axis was homing and went right down through the printer bed. So after a break and calming down, I put the z-axis back together, calibrated; and went to home it again. Same thing, it went right down through the printer bed; which was saved by being spring loaded. This time though; the z-axis couple snapped in half.
So, because of this complete printer failure and needing to order new parts anyway; I decided to do the upgrades that are suggested to get good accuracy. Mainly, G2 pulleys. So I ordered:
Moving along... I rebuilt with my new drive belts. The nice thing about the GT2 is that they are meant for this type of machine instead of the old T5 belts which aren't. It is also nice to go from a printed pulley to an aluminum one. So at the end of the day, the change is getting rid of printed parts (vitamins), lowering how much of the printer can be re-printed. I wouldn't suggest anyone build one of these without this immediate upgrade. In a moment, you'll see the stark contrast in quality.
So first, the change to the coupler:
So the current plan is to work a bit from on calibrating the printer to see if that resolves the issue of the Hexy piece now being slightly too small; unless the error is in the STL file. Regardless, I am very happy with the prints being produced; especially with so little changes to configuration. I'll be posting in the Arcbotics forum to see if the STL can be resolved further and to provide them more feedback. Next chance I get, I'll be reproducing an entire leg of parts for Hexy, and trying to print the Seej set again.
First; I was printing the Seej Starter Set, in preparation for taking my printer to work on my last day. While doing so, the printer gave up the ghost. Badly. First, the z-axis was homing and went right down through the printer bed. So after a break and calming down, I put the z-axis back together, calibrated; and went to home it again. Same thing, it went right down through the printer bed; which was saved by being spring loaded. This time though; the z-axis couple snapped in half.
So, because of this complete printer failure and needing to order new parts anyway; I decided to do the upgrades that are suggested to get good accuracy. Mainly, G2 pulleys. So I ordered:
- 2 x Timing Pulley, GT2, 20 Tooth - $11.00 each
- 3 x Timing Belt, GT2 - $9.00 each
- 2 x Motor Shaft Coupling, 5x8mm - $7.00 each.
Moving along... I rebuilt with my new drive belts. The nice thing about the GT2 is that they are meant for this type of machine instead of the old T5 belts which aren't. It is also nice to go from a printed pulley to an aluminum one. So at the end of the day, the change is getting rid of printed parts (vitamins), lowering how much of the printer can be re-printed. I wouldn't suggest anyone build one of these without this immediate upgrade. In a moment, you'll see the stark contrast in quality.
So first, the change to the coupler:
 |
| On the left, the printed coupler, on the right, the new aluminum one. |
 | ||
| On the left, the printed pulley, on the right, the new aluminum one. |
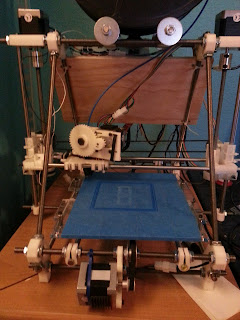
With the upgrades installed, it's like a new printer!
 |
| Printer, with new pulley/belt and new shaft coupling. |
So with an upgraded printer, it was timing to do a comparison print and produce a part for Hexy. This part should hold two small servos; which I just happen to have received from Hobby King today. My apologies for the following photo being upside down. What you see if a servo measured with a caliper compared to the Hexy piece it should fit it. The problem being the hole is the exact size of the servo, so it doesn't fit! Either does the screw, as predicted by the guys at Arcbotics.
One thing we can note in the picture below though; is the Hexy part on the left (right if the picture was flipped). That part was produced under the old belt/pulley/coupling system by the exact same STL file, and as you can see is obviously way too big.
So the current plan is to work a bit from on calibrating the printer to see if that resolves the issue of the Hexy piece now being slightly too small; unless the error is in the STL file. Regardless, I am very happy with the prints being produced; especially with so little changes to configuration. I'll be posting in the Arcbotics forum to see if the STL can be resolved further and to provide them more feedback. Next chance I get, I'll be reproducing an entire leg of parts for Hexy, and trying to print the Seej set again.


Comments