Posts

Create a "GG Button" With an IOT Button on Discord

Image
I was having some fun with my internet button (found here: https://store.particle.io/collections/shields-and-kits), and also working on some bot coding. So I decided to bring the two together; with the goal of pressing a button to summon a bot to my channel to play a sound effect(s). This would be similar to the famous https://www.ggbutton.com/ button, but would play a sound to everyone I am in a Discord channel with. Since I was already working with Darkside's SoundBoard bot for Discord; I decided to utilize the API. That way I'd be creating a simple web hook that could later be used for other purposes; like having Jenkins run a build/deploy. You can see the completed work in action: This comes from this source code: 1: // This #include statement was automatically added by the Particle IDE. 2: #include <HttpClient.h> 3: 4: // This #include statement was automatically added by the Particle IDE. 5: #include <InternetButton.h> 6: 7: ...

Upgrading The 3D Printer And Hexy Build Notes (Prusa RepRap)

Image
What a busy couple of weeks I have had. Many upgrades for the printer have arrived, and work continues on understanding and possibly building Hexy before my Kickstarter version arrives from Arcbotics . In this post I will cover the upgrades I have made to the printer; why I made the upgrades, their cost; and finally show some updated Hexy prints to show off the new accuracy. First; I was printing the Seej Starter Set , in preparation for taking my printer to work on my last day. While doing so, the printer gave up the ghost. Badly. First, the z-axis was homing and went right down through the printer bed. So after a break and calming down, I put the z-axis back together, calibrated; and went to home it again. Same thing, it went right down through the printer bed; which was saved by being spring loaded. This time though; the z-axis couple snapped in half. So, because of this complete printer failure and needing to order new parts anyway; I decided to do the upgrades that are sugges...

RepRap Rebuilt! A 3D Printer Story

Image
So it has been a long time since I made a real post; but we won't dwell on it. Instead, let us get to the good stuff and share some information! This post regards my long term rebuild of my Prusa Mendel Reprap, which I decided to do back in March. If you saw my previous blog posts, you will have seen the state of the printer. It worked, but it didn't print well and there were wires everywhere. I even used some CAT5 as motor wire. Because of the setup, the printer experienced many problems: Wires would catch during the printing run. The printer could not be moved. The RAMPS (Arduino Mega + Shield) kept getting bumped around, etc. So, I took the entire thing apart and took the following steps: All wires now use connectors (pictured below).  These are available at Ultamachine: http://ultimachine.com/content/molex-4-pin-plug-socket-connector-kit The power supply and RAMPS are mounted on a small piece of wood, which is mounted to the reprap (pictured below) The thermis...

Quick Post About Hexy

Image
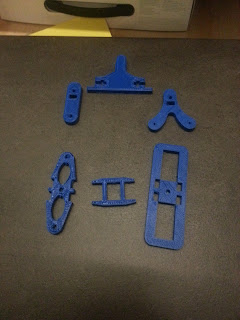
Hello, just a quick post about Hexy the robot. I was recalibrating the printer after finishing up the rebuild and wanted to do some printing. Since I was curious about the sizing of Hexy and also my ability to print parts for it; I decided to grab the STL files and get printing. There was trouble; not all of the stl files were ready, some of them needed to be run through http://cloud.netfabb.com/ first. It took me a while to figure this out; but once I found it everything went smoothly. You may be curious; so here are some leg pieces for Hexy; printed in blue PLA. That's all for now. I'm prepping a full post on the rebuild reprap; my robot progress, and another project that is coming along very nicely.

3D Printer Build Post 2 (RepRap Prusa Mendel)

Image
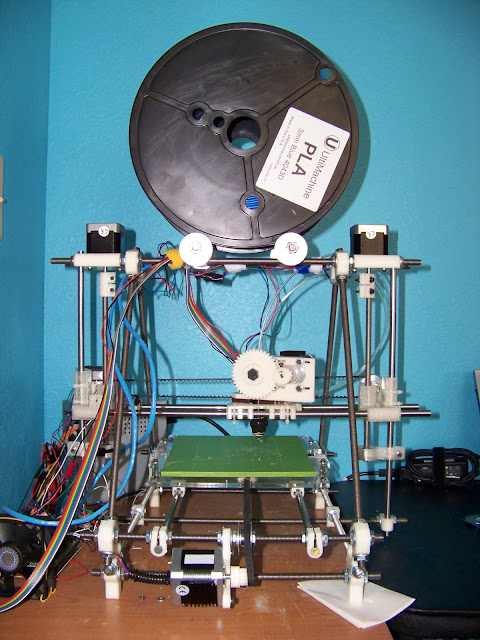
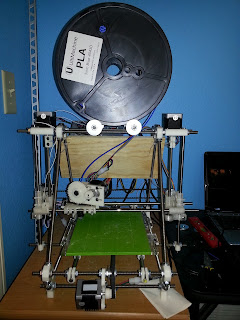
My long journey concerning this printer has turned out to be a glorious one. With objects coming off the printer with a pretty high quality; and my ability to design objects starting to form, it became time to share the progress and information. I will answer my own questions from the end of the previous post; outline more of the printer build, and share the general experience. Also, I will address the budget with an update. Alright, so let's see it! Above is my RepRap (Prusa) as it sits today. It is half converted over to version 2. I chose to do this conversion to understand the printer better, and more importantly to improve the prints. The original build calls for using printed clamps on the axis; and the plastic simply slides. This is fine; but the clamps have to be replaced periodically and you just don't get accurate movement. So I printed a new X-axis, new Z-axis, some stabilizers and purchased a set of LM8UU shaft bearings to mount the new parts. Here are close...

3D Printer Build Post 1 (RepRap Prusa Mendel)

Image
The long journey to building a 3D printer has been underway for quite a while now. With the complete set of parts ordered and much of the construction finished I decided to share the progress; outline my frustrations, and post about how you can benefit from my mistakes. I have been building the printer for over a month; and the last batch of parts arrived early this week. What can clearly be said about this project is that you will underestimate it. The original plan was to get this working in six months. Once construction was underway; it seemed more like a month. It now looks like this could really take up to six months (to produce a quality 3D printed part). In this part of the coverage; I hope to outline the budget and basic build so far; finally going over some problems and warning points. The budget for this printer is quite high. It is a mid-range open source 3D printer known as a Prusa Mendel. You can find the wiki for it here . I chose to start with the basics (more on thi...

Arduino Robot 3 - Part 1 - Reflectance Sensor

Image
This is the first part of my post covering my creation of the line following Arduino robot. In this post I will talk about the costs; setup and preparation for creating the robot. I will also discuss a few different approaches to line following that I explored. We will get the sensor attached to the robot and retrieving data. In the next part, we will cover the final approach used; tour the code, and see the full video. The budget for this tank is quite low, because we start with Robot 1. I chose to add a single reflectance sensor to the bottom of Wandering Tank; and remove the wall avoidance equipment. So, the budget: Robot 1 ($98.00) [See this post for building Robot 1] Sensor - Pololu QTR Reflectance Sensor $2.49 + $4.95 S&H (est) So Line Following Tank has an estimated budget of $105.00 to build. Since there is no need for the parts from Robot 2, the cost is very low. I would suggest coming up with a few other things to order so that you don't pay more in shippin...

Resuming My Robot Work With Bonus 3D Printer Project

Image
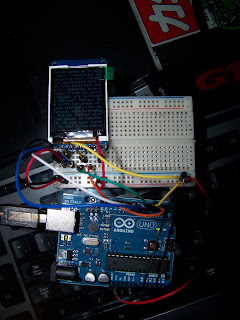
Well after a long break of working on the house; this blog will be returning to a primarily robot programming focus. My work on the house is shared elsewhere... So; I've resumed work on my robot and added a second Arduino to my arsenal; this way I can prototype ideas without disassembling the robot. I have used it to go through the tutorial for the TFT screen: The new Arduino is an UNO; they come in much more sophisticated packaging than their predecessor: That is a sticker sheet on the right and a EULA in the middle. The first nice thing to notice about the UNO is it auto switches the power source. You can see this difference and other slight changes in the comparison here: So; I will post about the robot again when line following can be demonstrated and the code is ready to share. I hope to share two versions (with and without TFT info printing). With that; the other exciting news is that I am building a 3D printer; which I will document here and share my proble...

Back To Robotics - A Long Awaited Update

Image
There has been next to no progress on my robot; this has been due to buying a house and realizing I would need to do a lot of work on it. That aside; I now have a work bench coming together and the time and money freeing up to get back to it (yay!). There is some news; there is now a local Maker Space getting started up. This may provide tools, resources and people to work with. I am very excited since I live nearby (about a mile away); though there is no way I could currently afford the membership fee. We will see; as I plan to stop by one of their open houses. More exciting; I have purchased a part. I saw the part come up on my reader feed and realized it was cheap and would go quickly. I refer to the 1.8 inch 18 bit color TFT LCD display with microSD card breakout released by adafruit. At only $25.00 I knew they would be gone in an instant so I just went ahead and purchased one! My goal for this is to use it for output from the robot; debugging output in the short term and more...

Improving your Netbeans Java Class Template And Including A License File

Well, working with Netbeans I have a problem occur over and over. One of those annoying programming tasks where you always make the change but are too lazy to deal with underlying problem. Today I decided to address on of them. Every time I create a class in Netbeans, there is a comment that appears at the top: /*  * To change this template, choose Tools | Templates  * and open the template in the editor.  */ My co-workers leave this in place; I am OCD about removing it every time. I don't like four lines of useless code at the top. This morning I decided to change this problem and maybe make my Java class templates a little better. I will walk through improving the class template, and adding the license file for display. This is a stub class created before the changes: /*  * To change this template, choose Tools | Templates  * and open the template in the editor.  */ package com.something.somewhere; /**  *  * @author GFrick  */ public...

New Site For Robotics And Electronics Supplies

I was browser my Google reader feed and a great site popped up. I've checked it out and once I get my work bench set up and get back to my robot; I'll definitely be ordering some things from here. I wanted to spread the word about the site: http://www.inmojo.com/ They have lots of RFID, Robotics and just Arduino stuff that I think would be cool to play with. I hope to get a full post up soon.

Installing the Sun (Oracle) JDK on 64 Bit Ubuntu From Shell

I had a bit of trouble installing the JDK via the shell; but I eventually figured it out. Seems a large part of the problem was differences in 64 vs 32 bit Ubuntu. I wanted to use the apt-add-repository, but had to figure out that it requires some python libs. Here are the simply steps if you have been looking: sudo apt-get install  python-software-properties sudo add-apt-repository "deb http://archive.canonical.com/ lucid partner" sudo apt-get update sudo apt-get install sun-java6-jdk After that, you should have javac/etc.

Arduino Robot 3 - Line Follower (Goals & Notes)

Work has begun on my third Arduino Robot. I decided that after some comments I read in various forums, that making a line following robot would probably be a proper increase in challenge. With research in hand, I placed my orders for parts and began looking into creating a test track. Here are the goals for Arduino Robot 3 - Line Following Tank: Conform to Robo Games Line Following Rules (2010)   Use only a single sensor. Robot should move in a smooth motion (no twitching about the line) I have begun the physical build, but I'm still looking into a 'practice arena'; I may end up taping together printer paper... Full report, code and video upon completion (so check back here). Edit: The reason for the single sensor goal is because someone trying to do similar with a Lego robotics set would only have one sensor. I do not want to be putting more money/hardware into any of the robots. They should be a challenge; and with my programming background I think that even two s...

Arduino Robot 2 - Wandering Tank

Image
My second robot was a bit more complex and ended up taking twice as long to build as originally intended. The budget changed, the designed changed, and my understanding of Robotics in general changed. The second robot is an attempt to make an obstacle avoidance robot that isn't overly simple. I will be outlining the goals, budget, build and code for Wandering Tank. The goals for Wandering Tank were simple: Should be able to scan an area in front of itself. Should be able to avoid not only walls, but obstacles. Avoid random decision making; the robot should use information when avoiding. Wandering tank meets these goals, and also looks pretty cool doing it. The code for the robot will show how the third goal is met and the other two will be obvious in the video. The budget for Wandering Tank was quite cheap. Since I started with Robot 1, the only additional cost for Wandering was the sensor and the servo. Robot 1 ($98.00) Sensor - Digital Distance Sensor 10cm $6.95 + $2.00...

Arduino Robot 2 - Part 1 - Forward Scanner

Work has been coming along well on the development of the second version of Arduino Robot. There have been multiple set backs; the biggest of which is my purchase of a continuous rotation servo instead of a normal one. Otherwise the bot is constructed and mostly works in tests. The goals for Robot 2 were a step up from Robot 1: Ability to continually scan in front of itself. Ability to back and turn to avoid obstacles. Smoother movement. Basically Robot 2 is a wandering avoidance robot; called Arduino Robot 2 - Wandering Tank. For this to work, I needed some type of affordable sensor to place at the front of the robot; and from there the ability to look around with it. My solution was to mount a sensor on a servo. The servo would be used to sweep across a selected field of vision looking for possible collisions. So Wandering Tank has to do the following: Move Forward Scan left to right Move backwards while object detected Turn after object no longer detected  Repeat...

Arduino Robot 1 - The Basic Tank

Image
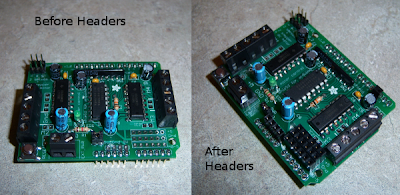
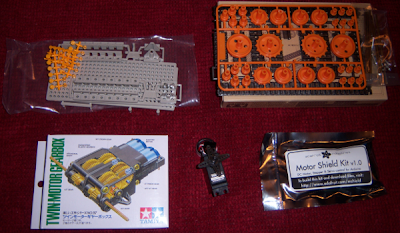
What you see below is the result of my first attempt at building a robot. The goal was to build something Arduino based. It would move forward, turn around, come back; and then turn around again to be in its original position. Finally, I wanted to try multiple part selling web sites, to get experience with who to buy from. Fortunately; they were all better than expected experiences. My Arduino was a Christmas present; but I will be factoring 32.00 into the cost of the project to account for it. The first phase was an order from SuperDroidRobots.com. Tank treads, a double motored gear box, and some plastic to build a chassis came in at $40.00. The second order was from Adafruit.com, for a continuous rotation servo and an Arduino Motor Shield. The Adafruit order also came in at $40.00. Subtracting the cost of the unused Servo, this robot is built for just under $100.00. You can see the initial parts order below. I started by building the motor shield, this is the motor shield kit wh...